
Adobe Podcast Review | Can it Really Replace a Recording Studio?
The single greatest sin in the world of podcasting and video content isn't a boring topic or a shaky camera; it's bad audio. It’s that distracting hum, the echoey room that makes you sound like you’re broadcasting from a bathroom, the hiss that clings to every word.
This is the fastest way to make your audience smash the 'back' button. For years, the solution was expensive microphones, soundproofed rooms, and complex software that required a sound engineering degree.
But what if you could erase all of that with a single click? That’s the audacious promise of Adobe Podcast. So, my team and I decided to put this supposed wizardry to the ultimate test.
In this Adobe Podcast review, we're diving deep into the results, the limitations, and whether this AI is truly ready to be your personal, on-demand sound engineer. Let's find out if the future of audio is really just a drag-and-drop away.
Pros and Cons of Adobe Podcast
Pros
- High-quality audio enhancements improve clarity and professionalism
- User-friendly interface similar to Google Docs
- AI-powered transcription allows for easy audio editing
- Web-based platform enables access from anywhere with internet connectivity
- Integration with Adobe Creative Cloud enhances productivity and workflow
- Includes a robust library of royalty-free music and sound effects
- Features drag-and-drop timeline for easy edits and non-destructive editing to preserve original recordings
Cons
- Limited features in the free plan; requires a paid subscription for full functionality
- Internet dependency, requiring a stable connection for optimal use
- Some advanced editing features may be lacking, limiting professional use
- No video editing capabilities; restricting to audio-only content creation
- Transcription errors may require manual correction, affecting workflow efficiency
A Closer Look at Adobe Podcast Features
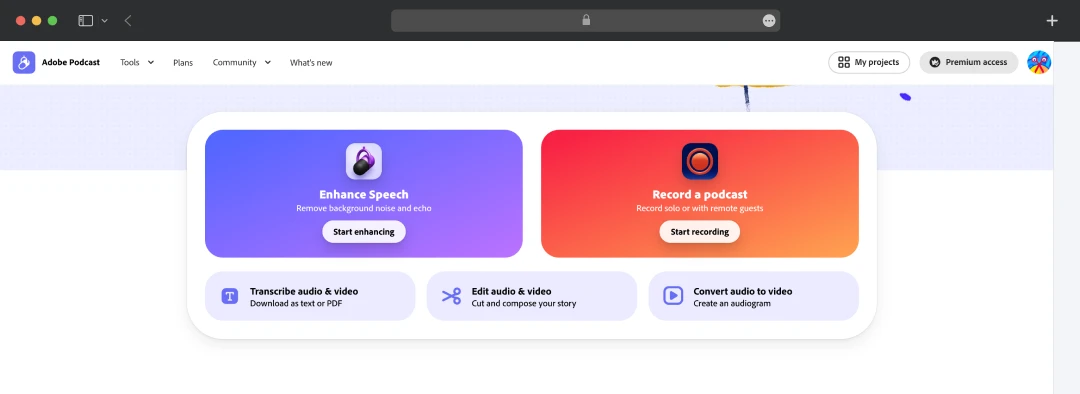
Here are the key features of Adobe Podcast, with a brief explanation for each:
1. Enhance Speech with a Single Click
This is an AI-powered tool that automatically removes background noise and echo from your voice recordings. The Adobe Podcast enhancer is designed to make recordings sound as if they were captured in a professional studio, even if you are using a low-quality microphone. You can upload various audio and video file formats to be enhanced.
2. Mic Check with AI
Before you start recording, this feature analyzes your microphone setup and the acoustics of your recording space. It then provides you with real-time feedback and suggestions to help you optimize your audio settings. This helps to ensure you are capturing the best possible sound quality from the start.
3. Adobe Podcast Studio
This is a web-based recording and editing platform that allows you to record high-quality audio, either by yourself or with remote guests. Each person's audio is recorded on a separate track, which gives you more control and flexibility during the editing process. The audio is recorded locally, so a poor internet connection won't affect the final recording quality.
4. AI-Powered Transcription and Text-Based Editing
Adobe Podcast software automatically transcribes your recordings into text. This allows you to edit your audio by simply editing the text, just like you would with a Word document. You can cut, copy, and paste sections of your audio by manipulating the corresponding text, which makes the editing process much faster and more intuitive.
5. Royalty-Free Music and Sound Effects
The platform provides access to a library of professionally produced, royalty-free music and sound effects. This includes intros, outros, and background music that you can easily add to your podcast episodes. This helps you to create a more polished and professional-sounding final product without having to worry about music licensing.
Helpful Read: 10+ Best AI Music Generators in 2026
What can You Use Adobe Podcast for?
Here is a table outlining the use cases for Adobe Podcast AI based on the image you provided.
| Use Case | Description |
|---|---|
| Transcribe a file | You can upload an audio or video file and have Adobe Podcast automatically transcribe its spoken content into text. This can be useful for creating show notes, content repurposing, or making audio searchable. |
| Record a podcast | You can record new podcast episodes directly within the platform. It supports both solo recordings and remote recordings with multiple participants. |
| Edit an audio or video file | You can upload existing audio or video files to the platform for editing. The text-based editing feature makes it easy to cut, trim, and rearrange sections. |
| Convert audio to video | You can simply take an audio file and turn it into a video. This is often used to create audiograms or simple videos for sharing podcasts on video-centric platforms like YouTube. |
| Add captions to the video | For existing video files, Adobe Podcast can automatically generate and add captions. This enhances accessibility for viewers who are deaf or hard of hearing. |
Also Read: Best Audio Editing Apps for Android Users
How to Use Adobe Podcast
My experience with Adobe Podcast has been quite seamless and here’s how I used it:
1. Access the Platform
Open a compatible web browser and visit Adobe Podcast.
2. Create an Adobe Account
Click “Sign Up”. It is at the top right of the page. Enter your email address, choose a password, and complete the registration to get your Adobe account.
3. Use Mic Check
Visit the Mic Check page here to test and adjust your mic setup.
4. Start a New Project
Click on the tools drop-down and select the “Studio” option. Next, click on “New Project”, name your project, and begin.
5. Explore the Interface
Once logged in, select the Adobe Podcast Studio from the dropdown option. Familiarize yourself with various options like “Upload,” “Music,” “Placeholder,” and “Settings.”
6. Record Your Audio
Hit the red “Record” button, allow microphone access when prompted, and start speaking. Click “Stop” when finished.
7. Import Existing Audio
Select “Import” > “Audio” and choose the audio file from your computer. It will appear as a waveform in your workspace.
8 Edit Your Audio
- Use transcript-based editing to cut or rearrange audio by editing text.
- Timeline editing allows for precise audio segment adjustments.
- Utilize additional tools like split, trim, fade in/out, and adjust audio levels for refinement.
9. Enhance Your Audio
Use the Enhance Speech feature by navigating to this page, uploading your file, and letting the system process it.
10. Add Music and Sound Effects:
Select tracks that suit your podcast's theme from the “Music” section on the left sidebar and drag them into your project.
11. Export Your Podcast Episode:
Click “Export”, select your format (MP3, WAV, etc.), choose quality settings, and download your final audio file.
Understanding Adobe Podcast Pricing
Here’ a detailed overview of Adobe Podcast cost and premium plans-
| Type of Plan | What You Get | Price of the Plan |
|---|---|---|
| Free | Enhance Speech Single file upload Max 30 min duration 1 hour/day Studio Unlimited remote recording Max 30 min project duration 2 project downloads/day Transcription & text-based editing Podcast-branded audiograms Mic Check AI analysis of the microphone setup |
Free |
| Premium | Enhance Speech Audio & video enhancement Bulk file uploads Strength adjustment for natural sound Max 2-hour duration 4 hours/day Studio Unlimited remote recording No download limits Download original, speaker-separated recordings Customizable audiograms & captions Remove Adobe Podcast branding Mic Check AI analysis of the microphone setup |
$9.99/month |
*The paid plan comes with a 30-day free trial. You can try out the following features with the free trial-
- Uploading multiple audio files
- Enhance up to 4 hours a day
- Includes premium features on Adobe Express
Customer Reviews
How was your experience with the product?